
Written By : Getahun Teferi
SAP Functional and Business Consultant
Electrical and Computer Engineer
Certified SAP Digital Badge in SAP S_4HANA Cloud - Support and Success Essentials for  SAP Consultant
Module 1: Project Management Process Overview
Module 2: Project Creation and Maintenance
- Module Introduction
- Data Required to Create Non-capitalized Project Structures
- Pr-Requisite Steps: Setting Up a Project
- Create a Project
- Create a Project Definition, T-Code CJ20N
- Create a WBSE, T-Code CJ20N
- Schedule WBSE’s
- Define UN Assignments
- Create a Project Cost Plan, T-code CJ240
- Release the Project for Budgeting, T-code CJ20N
- Budget Project
- Procure Goods & Services
Module 3: Project Implementation
- Module Introduction
- Run Progress Reports
- Update Status
- Conduct M&E Activities
- Conduct Risk Management
- Conduct Final Evaluation
Module 4: Project Systems Reporting
- Module Introduction
- Project Management Reports
- Structure Report
- Actual Cost Report
- Project Budget Balance Report
- Cost Element Report
- Funds Management AVC Report, T-code CN43N
- FM Budget Report
- FM Budget Usage Report
- BI Reports Report
- Project Budget Balance Report
- Project System Analysis Area
Appendix and Reference Information
Module 1: Project Management Process Overview
The purpose of the Project Management User manual is to explain the Project Management (PJ) process at UN. The project Project Management (PJ) module is used within the UN to manage voluntary-funded activities, thereby providing enhanced visibility to donors and member-states contributing resources to specific initiatives.
End-to-End High-Level Process
The end-to-end project Grant Life Cycle process can be seen below:
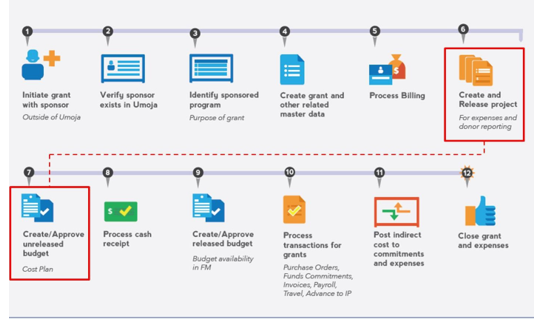
Utilizing the project module enables the UN to:
- Manage voluntary-funded projects and support portfolio decisions more effectively - in a uniform and concrete fashion
- Aids in effective stage gate/controlling of the project and the budgeting process, and early identification of bottlenecks and risks
- Allows pooling of information from different systems, such as FM, GM and SRM. As a result, you can monitor and coordinate all projects in your enterprise and make optimal use of valuable and finite resources
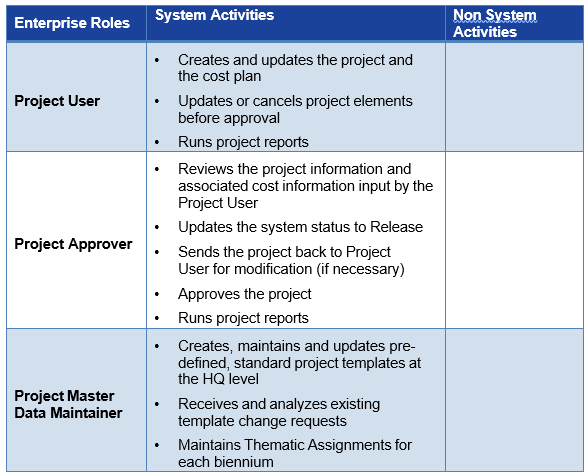
Enterprise Roles & Responsibilities
The following EEP Enterprise roles are involved in the Project process:
Key Concepts
This manual includes the following key points: In project, there are two methods of managing voluntary funds. In general, we utilize the following approach to delineate appropriate options, which are highly dependent upon project- type and duration:
Use a Project (Project Management)
- Complex set of activities that need to tracked individually
- Implemented by multiple Resp. Cost Center
- Funded by multiple Grants
- Addressing multiple Functional Areas
Use Internal Order
- Group of activities, no need to track individually
- Implemented by one Resp. Cost Center
- Funded by one Grant
- Addressing one Functional Area
Note: Both CO objects – Projects and Internal Orders – can be used as cost collectors for investment activities to be capitalized as Assets under Construction (AuCs). Master Data in project To create a project in the project solution, the relevant Master Data elements need to be configured. The Master Data elements involved in the PJ process are:
- Project Definition/Project Profile: Determines the profile of a project as well as its basic parameters. For example: project name, project start and end dates. Values defined at the Project Definition level apply to the entire project structure
- WBS Elements (WBSE's): Are used to plan and organize the hierarchy of a project. It is equivalent to a level in a project structure. Hierarchy of WBSE's can be further expanded to achieve the required level of detail
- Project structures in project are hierarchical structures
- A project can be broken down to WBSE, which help classify costs, milestones and tasks required to complete the over-arching output of the project. The hierarchical, tree-like nature of WBSE’s tree structure sub-divide components of a voluntary- funded project into defined buckets (or pieces) for cost controlling and monitoring purposes
- A WBSE can also provide the framework for detailed cost estimating and suitable guidance for project-specific schedule development. Essentially, it allows you to monitor project components, costs and milestones at a more granular and defined level
The recommended usage of WBSE's within a project definition is as follows:
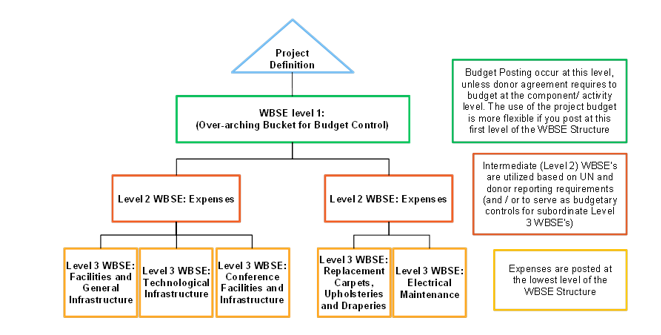
Designing WBSE's: General Guidelines
In determining how to create distinct WBSE's within a specific project, it is best to exert the appropriate effort to map out all requirements of the project. Primary drivers of WBSE design are the reporting, milestone and audit requirements established by the UN and the project’s donors:
- Document all deliverables and components of work that you think your project entails
- Group these items into a few major categories with common characteristics and eliminate any deliverables or work components that are not required
- Divide the deliverables and work components under each Level 2 category into groups with common characteristics
- Identify any additional deliverables or work components that you overlooked in the categories you created
- Continue in this manner until you have described all project deliverables and work components completely
Project Management Lifecycle within project
Given below are the stages in the Project Management lifecycle within project
Picture
Module 2: Project Creation and Maintenance
Module Introduction
In project, every project is linked to a Funded Program to simplify reporting and to allow budget control. The Project Builder is split into different areas, such as structure tree, worklist and template and work area. Project Creation and Maintenance process describes the creation or the re-planning of a project to address an identified need or objective. The key elements of a created project include Window for project structure and entry mask for project definition. Process of how to create a project in project
Picture
Data Required to Create Non-capitalized Project Structures
In order to create a non-capital, voluntary-funded project within the project solution, the following information is needed:
Operating Structure within Project
- Project Profile
- Project Type
- Business Area
- Responsible Cost Center
- Person Responsible
- Applicant
- Functional Area
Grants Management
- Grant
- Sponsored Program
- Geography of Beneficiary
Pr-Requisite Steps: Setting Up a Project
Creating a Project
The per-requisite steps While creating a Project are as follows:
- Within GM, a grant and sponsored program are created for a specific project or initiative
- UN Staff within FM and GM will formulate the budgetary requirements of the grant
- Project staff will confirm the UN and donor reporting requirements for the non-capitalized, voluntary-funded project
- Initial Grant Creation within GM Module are as follows:
Type
Sponsor
Grant Description
Currency
Picture
Accessing the Project Builder
You can access the Project Builder using the T-code CJ20N. The screen components of the Project Builder are shown below.
Structure Tree Area
The Structure Tree area displays the project objects (Project Definition, WBSE’s, activity, activity element, milestone and document) that you have selected in its hierarchical context. In the Structure Tree area, you can:
- Change the dependencies and assignments of individual project objects manually by using drag and drop
- Create or delete project objects
- Specify number of hierarchy levels being displayed in the user-specific options
- Choose whether you want to see a preview of the last project you have processed, when entering the Project Builder
Work list and Templates
The Work list and Templates section provides access to the work list and templates.
- In the Work list, you can store user-specific, frequently used project data (Project Definitions, networks, and WBSE’s) for quick access
- In the Work list, you can view a list of the last five projects that you have worked on
- Templates are managed at the Peacekeeping Mission level, by the PM Master Data Creator
Work Area
The Work area provides a detailed view of the object selected in the structure tree. You can also directly access overviews of subordinate objects. In the Work area, you can:
- Execute all the business transactions for project coordination and execution
- Move between the detailed view of the selected object and the overviews of the subordinate objects
You can access the Project Builder using the T-code CJ20N. The screen components of the Project Builder are shown below.
- Structure Tree Area
- Work list and Templates
- Work Area
Picture
Navigating Tabs in Project Creation
Within the Project Builder, there will be three primary tabs you will access in order to create a project structure and its associated WBSE's. To create a project, data needs to be populated in the following tabs: Basic Data tab: General information about the Overall Project or WBSE. This tab is populated while creating the Project Definition and a single WBSE. While creating a Project Definition, the fields in the Basic Data tab to review and denote are:
- System Status: The current status of a WBSE
- Pers. Resp. No.: Individual or department responsible for the management of this WBSE
- Start date: Project start date (projected or actual)
- Finish date: Project finish date (projected or actual)
- Company Code
- Business area: Business area responsible for the WBSE
- Functional Area: Functional area responsible for the WBSE
- Project Currency
Picture
Control tab: Identify what type of non-capitalized project it is. While creating a Project Definition, the field in the Control tab to review and denote are:
- Project profile: The type of project being created (capitalized or non-capitalized)
Note: Once selected, the Project Profile cannot be changed later on.
Picture
Assignments tab (WBSE Creation): In creating a WBSE, the fields in the Assignments tab to review and denote are:
- Proj.type: The type of project being managed by this WBSE
- Pers.Resp.No: This field is typically inherited from the Project Definition (within the Basic Data tab). It can be updated if the person (or organization) responsible for this WBSE is different
- Resp. cost cntr: The Cost Center to which all costs associated to the WBSE will reconcile to
- Acct asst elem.: This indicator denotes that this WBSE permits financial postings or this is being used for Budget Control Purposes for other, subordinate WBSE's. Deselecting this indicator implies that this WBSE is only being used for UN or donor reporting purposes and not for any other purpose
Picture
Dates tab: In creating a WBSE, the fields in the Dates tab to review and denote are:
- BscStart: Date financial postings may begin to reference this WBSE
- Bsc Fin: Date financial postings my no longer reference this WBSE
Note: Dates entered in this tab should fall within (or equate to) the project start and end dates identified for the overall project.
Picture
UN Assignments tab: In creating a WBSE, the fields in the UN Assignments tab to review and denote are:
- Grant: Grant associated to the WBSE. Only one grant may be associated to each WBSE
- Sponsored Program: Sponsored program associated to the WBSE. Once you select a grant, only those sponsored programs assigned to the grant will be valid options in this field
- Geography of the Beneficiary: This section is identified for reporting purposes
- Thematic Assignment: This section is identified for reporting on thematic project expenditures
- Budget Control WBSE: This field triggers the creation of the Funded Program for the project. It defaults the top level WBSE ID upon creation, but can be overwritten by the user
Picture
Create a Project
The Project Creation and Maintenance process describes the creation or the re-planning of a project to address an identified need or initiative.
Business Process Context
The high-level steps in the Project Creation and Maintenance process are as follows:
Picture
Note:
Budgeting activities for projects are performed in the Grants Management module of project. There are three steps in managing a project .
Step 1: Create a Project
The first step in managing a project using project is creating a Project Definition, and defining associated key elements. Key elements of a project include project profile, project duration, project type, applicant and person responsible for the project (overall).
Picture
Step-by-Step Instructions
The steps to create a Project Definition are as follows:
- Enter CJ20N in the Command field
- Click the Enter icon. The Project Builder: User-specific options screen is displayed
Picture
Note: The Project Builder: User Specific Options screen opens, only the first time you can access this transaction code. Similarly closed screen to proceed
The Project Builder screen is displayed.
- Click the Create icon. The Create drop-down list opens
- Select Project from the drop-down list
Picture
The structure of the project you created is displayed. The key elements of a created project include:
3.A window for project structure
4.An entry mask for project definition
Picture
5. Enter an appropriate description in the Project Def. field 6. System automatically defaults to the Control tab 7.Select an appropriate option from the Project Profile drop-down list
Note: You cannot switch between tabs until you fill in the required fields.
Picture
Project profiles are settings in configuration that have been predefined for specific business processes in the company/organization. These settings define how projects behave in the system. Selecting the wrong project profile may result to incorrect recording of the transaction in the books. For example, the settlement of a project using the capital project profile (ZAA) will ensure that the costs will be recorded as an asset in the general ledger whereas the costs of a non-capital project profile (ZSB) will be recorded as expense. Picture
8.Click the Basic data tab
9.Enter appropriate data in the following fields:
- Pers.Resp.No.: Role of the Person in charge of the project administration
- Applicant no.: Determine applicant for thematic assignments
- Start date: Actual/expected start date for the project
- Finish date: Actual/expected end date
- Business area
- Functional area
Picture
10.Click the Enter icon. The Project Definition ID is automatically created. The project definition and description are displayed in the Project Structure section
11.Click the Save icon
Note: Once you select the Save icon, the project builder will close out the Project Definition Details from the right-hand part of your screen (the work area). You must re- select the Project Definition to continue work within this newly created Project Structure.
Picture
12.Once a project definition is successfully saved and created, a confirmation displays in the lower left-hand portion of the status bar
13.The project definition will also display in the Last Project Processed list within the
Work list and Templates component of the Project Builder Note.Since the Project Builder automatically closes out Project Definition details from the work area after you select the Save icon, you may re-access the project you were working in by selecting the appropriate Project Definition within the Last Projects Processed list
Picture
Create a WBSE, T-Code CJ20N
Business Process Context
Before you create a WBS for a project, you are required to open the relevant project from the Worklist and Templates component of the Project Builder.
Picture
Step-by-Step Instructions
The steps to open a created project are as follows:
- Enter CJ20N in the Command field
- Click the Enter icon. The Project Builder screen is displayed
- Click the Open icon
- Enter the Project Definition ID of the project you wish to open
Note: You can also open a project by selecting the project definition from the Work list section.
Picture
Step-by-Step Instructions
The steps to create a WBS for the selected projected are as follows:
- Click the Templates button available above the Workl ist section of the screen
- Click the Expand icon for the individual projects
Picture
Step 2: Create a Project
The second step in managing a project is creating a high-level Level 1 WBSE.
Step-by-Step Instructions
The steps to create a first-level WBSE are as follows:
- Click the WBS element icon and hold the mouse click button down
- Without releasing the mouse click button, drag the selected item to the Project Definition section of the Project Structure area
- When a plus sign is visible in the Project Structure area of the screen, release the mouse click button to drop the WBS element icon
Picture
The WBSE entry mask is displayed with a default WBSE ID.
- In the Basic data tab, validate that the WBSE ID matches the Project Definition ID
- Enter appropriate description in the WBSE Description field
- Select appropriate option from the Proj. type drop-down list
- Populate the following fields:
- Responsible cost Center
- Req. cost center.
Picture
- In the Operative indicators section, select the appropriate Operative Indicator
Note: Typically, a WBSE is created to include the Acct asst elem. check box. In very rare cases, if you are billing the donor for project-related costs, you may clear the Acct asst elem. check box and select the Billing element check box Picture
- Click the Enter icon. The WBSE ID is automatically created and matches the Project Definition ID. The WBSE and its relevant description are displayed in the Project Structure section
Note: The first WBSE created is always the top-level, Level 1 WBSE.
Picture
Step 3: Create a Project
The third step in managing a project is creating a lower-level WBSE's. Once the Level 1 WBSE is created, you may add additional WBSE's to the Project based on UN and donor reporting requirements.
Note:
The steps for creating a second-level WBSE are the same as the steps for creating the first-level WBSE, barring one exception. It must be moved to the proper hierarchy location within the Project Structure. The steps to create a second-level WBSE for the project are as follows: 1. Select the appropriate check box in the Operative indicators section Picture
The steps to set User Status to Set and Pass On are as follows:
- Click the Open icon in the Project Builder
- Select the Project Definition ID of the project to be updated and confirm by selecting the green check
- Click the Expand All icon
- Select the WBS element to be updated
Note: Each project requires at least one budget control WBSE to receive budget allotments. Defining a budget control WBSE triggers the creation of a funded program in FM. Picture
Schedule WBSE’s
Business Process Context
Once all WBSE's are created, they must be scheduled with respective start and end dates. Every WBSE must have a validity period for financial postings. These dates should fall within the project state and end date range identified within the Basic data tab of the Project Definition. Picture
Step-by-Step Instructions
The steps to schedule WBSe’s are as follows:
- Select a WBSE
- Click the Dates tab
- Enter the Basic start date in the BscStart field
- Enter the Basic finish date in the BSC Fin field
- Repeat the exercise for all WBSE's
Picture
Picture
Step-by-Step Instructions
The steps to define UN Assignments for each WBSE are as follows:
- Select a WBSE
- Click the Tab icon
Picture
- Select the UN Assignments option
- Populate the following fields:
Grant
Sponsored Program
Country
Budget Control WBSE
- Click the Save icon
Picture
Note: When you copy a project, there is an issue with default Budget Control WBSE's. It is best to use a template or create it from scratch. A common mistake made on the UN Assignments tab is not pressing the Enter key on your keyboard after locating the appropriate Grant. The subsequent Sponsored Program field will not display applicable options until Enter is clicked.
Note: Within the UN Assignments tab, ensure the Grant, Sponsored Program and Budget Control WBSE are properly identified for each level of the Project Structure. Picture
The steps to validate entries for each of the WBSe’s are as follows:
- Select a WBSE
- Validate if the default values are displayed for the Proj. type and Resp. cost cntr fields
- Repeat the exercise for all WBSE’s
Picture
You may visually review the overall Project Structure of a project by selecting the hierarchy graphic:
- Select the Hierarchy Graphic icon
Note: Other methods of viewing a Project WBSE hierarchy are available in the Hierarchy Graphic's navigational structure (above). This set of buttons provides additional features, which you may explore when reviewing your overall Project Definition and WBSE hierarchy.
Picture
Create a Project Cost Plan, T-code CJ240
Business Process Context
Project Foundation uses Structure Cost Planning via WBS for project cost planning. Structure Cost Planning via WBS requires manual entry of costs (lump sum amount) against a WBS structure without regard to cost elements, for example, materials, contractual services and staff costs.
Note:
Project cost planning is used for tracking and reporting purposes only; it is not budget formulation for projects. Picture
Step-by-Step Instructions
The steps to access the Change Cost Planning: Initial Screen are as follows:
- Enter CJ240 in the Command field
- Click the Enter icon. The Change Cost Planning: Initial Screen is displayed.
Picture
Next, select the project that requires cost planning. The steps to select a project that requires cost planning are as follows:
- Enter the Project Definition ID in the Project Def. field
- Click the Cost Planning button. The Change Cost Planning: WBS Element Overview screen is displayed
- Picture
The steps to define lump sum amounts per WBSe for a period and calculate the annual value are as follows:
- Select the appropriate option from the Period drop-down list
- Enter appropriate Cost plan values for each line item in the Annual Values section
Picture
Click the Edit menu. Select the Select > Select All menu item Picture
All line items in the Annual Values section are selected Picture
4 Select the Edit menu 5.Select the Total Up menu item Picture
The Total Up window is displayed Picture
- 6. Click the Check icon to confirm whether the entered data is correct. The Structure planning: Display messages window is displayed
Picture
1.Next, you need to update the cumulative view of the plan. The steps to update the cumulative view are as follows:
- Select the Edit menu
- Select the Copy View menu item. The list of View options is displayed
Picture
3. Select the Cumulative option
4.The Copy view window is displayed
5.Confirm the data entered in the Copy view window
Picture
- Click the Check icon to confirm whether the entered data is correct
Picture
- Click the Save icon. The successful status of the check is indicated in the status bar
Picture
Release the Project for Budgeting, T-code CJ20N
Business Process Context
Before releasing the project for budgeting, change the user status to Ready for Release.
Picture
Step-by-Step Instructions
The steps to Release the Project for Budgeting are as follows:
- To change the User Status, click the Edit menu. Select the Status > User Status > Set
> Ready for Release (RFR) menu item
- From the User Status screen, select the user status and confirm by clicking the Continue icon Note: Only the Project Management App rover can assign this user status in order to release the project thereafter.
Picture
Note:
- If the user status update applies to one WBS element only, click the Edit menu. Select the Status > User Status > Set menu item
- If the user status update applies to all WBS elements subordinate to the selected WBS element, click the Edit menu. Select the Status > User Status > Set & Pass On menu item
- From the User Status screen, select the user status and confirm by
- Select the appropriate User Status
Picture
- Once you select Edit > Status > User Status > Set & Pass On, the following set of options will display:
- A newly created project will be in the status of IPP - Initial Planning Phase
- A project ready to be released for budgeting by GM will be set to the status of UBR – Under Budget Review
- Once a project is approved and released with budgeting, it will be set to the status of
RAB- Released and Budget
- Click the Continue icon
Picture
- The User Status: Display messages screen displays:
- This confirmation screen confirms which WBSE elements have been set for budgeting by GM
- Note how this confirmation indicates the WBSE identifiers and person responsible for each WBSE
Picture
Note:
A whole project can be released by selecting and releasing the Project Definition. This Level 1 Release will change the status of all subordinate WBS Elements.
- If you do not wish to release an entire project, subordinate levels can be released individually, by completing the subsequent steps
- If WBS Elements are released individually, the Project Definition will show PREL – Partially Released
You must highlight a WBSE with your cursor in order to properly carry out subsequent steps to Set and Pass on a project for budgeting.
Picture
Releasing a Project for Use – Approval Methods
There are two ways to release a project.
Picture
You can release a project partially by selecting the WBSE’s you wish to release.
Note: This is a manual task. When you select a higher WBSE for release, all WBSE’s under it also get selected for release.
Picture.
When you select a lower WBSE for release, it does not impact the higher WBSE in any way. The higher WBSE is still unapproved and cannot be used to charge items to.
Picture
Step-by-Step Instructions
The steps to release the project for budgeting are as follows:
- Enter CJ20N in the Command field
- Click the Enter icon. The Project Builder screen is displayed
- Select the project to be released from the Project Structure area of the screen
- Click the Edit menu
- Select the Status > Release menu item
Note: This releases the entire project.
Picture
You can also manually release individual WBS elements.
- Expand the entire project structure by clicking the Expand All icon
- Select the WBS element to be release and navigate to the following menu item: Edit >
Status > Release
Note: The release within a project structure works top-down. When you release a WBS, all the subordinate ones are also released.
Budget Project
Steps during budgeting a project:
Picture
Procure Goods & Services
Steps during procurement of goods and services:
Picture
Module 3: Project Implementation
Module Introduction
After a project is released or partially released, it is ready for implementation. During this process:
- Project implementation activities commence and progress until completion
- Real-time financial and operational reports are generated to monitor progress of the project
Throughout the process, the actual data generated is compared with the planned dates and costs. If appropriate, unplanned variances are documented. This module includes the following key points:
- The comparison of planned versus actual dates and costs is crucial for the purpose of progress analysis
- Within project Foundation, projects/WBSe's and networks are available for utilization as account assignment objects within the integrated solution
- The comparison of planned versus actual dates and costs is crucial for the purpose of progress analysis
- Within project Foundation, projects/WBSe's and networks are available for utilization as account assignment objects within the integrated solution
Picture
Run Progress Reports
During Project Implementation, the Project Analyst runs progress reports from the system. Based on the reports generated, analysis is done to determine any schedule or cost variances and to plan necessary measures. For example, stop the project, allocate more budget or update the scheduling. Any activities that are related to the re-planning of the project will be carried out in Project Creation and Maintenance.
Update Status
The Project Analyst may monitor the project by setting the status of each WBSE or activity according to the degree of progress. The status of each WBSE can be set to any of the following:
- Technically Completed (TECO): The TECO status indicates that a task/activity is completed, but allows actual postings/settlements to occur. No new commitments can be created for a TECO project. If the TECO status is cancelled on a WBSE, the status will be automatically set back to Released for that particular WBSE only
- Closed (CLSD): The CLSD status is used for a WBSE or WBSE's that have been completed from a logistics and accounting point of view. The CLSD status can be cancelled for a particular WBSE
- Deletion Flag (DLFL): The DLFL status designates WBSE or WBSE's that have been flagged for deletion. This means that the object is marked for deletion, but has not yet been deleted
Conduct M&E Activities
In project Foundation, the Project Analyst performs the M&E activities outside project. Since M&E activities are not automated, it is recommended that:
- All M&E related tasks are defined as activities in the project plan, with defined start and end dates
- The M&E method should be defined, for example, questionnaires or surveys, and measurement techniques should be finalized
Note:
The results of M&E activities can be qualitative or quantitative. The results are updated in the system as metrics or KPI’s. In the project Foundation, a limited number of KPI’s will be calculated in the system.
Conduct Risk Management
The Project Analyst completes this activity outside project. The activities may include the following:
- Identify any new risk(s)
- Assess the impact of the risk(s)
- Identify ways to reduce the risks
- Prioritize the risks
- Monitor and control the probability of the risk occurring
- Update the project WBSE’s and tasks, based on the changes
Conduct Final Evaluation
After the status of the project has been set to CLSD, the following processes, outside PS, get triggered depending on the project profile:
- Assign equipment
- Write-off
- Assets under construction
- Close main implementation grant
Module Introduction
This module includes the following key points:
- UN and Donor reports vary based on the nature of the audience:
- Substantive Reports (Narratives): These are management reports, analogous to activities or performance report (usually created by an individual in the field who is tasked with closing out a grant)
- Financial Report (PJ): These reports are cost-driven (usually created by an UNHQ budget officer). They focus on the financial perspectives of a project
- The key of reports used in PJ are:
- project ECC:
- Transaction Code: CJI3 – Line Item Report
- Transaction Code: ZPJPRJBUDBAL – Budget Balance Report
- Transaction Code: ZPJCOSTELEMENT- Expenditure Report
- Transaction Code: CN43N – WBS Element Report (master data)
- Transaction Code: FMAVCR02 – Control Object Values: Overall Data Report
- Transaction Code: FMRP_RW_Budget – Budget Report
- Transaction Code: FMRP_RW_BudCon – Budget Consumption Report
- project BI Portal:
- ZZFM_M01_R0021 – Project Budget Balance Report
- ZZPS_M01_R0001 – Project System Analysis Area
- The high-level steps in the Running Project Reports process are:
Picture
Project Management Reports
The reports used across Project are:
- Structure Reports: These reports summarize data based on project master data and structure information. Any attribute on the project will be summarized so that reports can be used to evaluate data objects as well as logistical and accounting key figures
- Hierarchy Reports: These are similar to structure reports. They summarize at the WBS level, but do not include any Master Data information. Hierarchy reports are drill-down reports for evaluating the costs, revenues and payments of one or more projects interactively
- Cost Element Reports: These reports display cost by cost element, which are mapped to G/L accounts. The cost element to be evaluated can be chosen and structured in the navigation panel
- Line Item Reports: These reports show every debit/credit transaction that hits the project. All line items are evaluated allowing the user to select columns, calculate subtotals and drill down to the original entry documents
- Progress Analysis, Progress Tracking Reports: These reports are suitable both for the internal control of a project and for external reporting. They can either help to estimate the Percentage of Completion (POC) of the WBSe's, activities and activity elements or the values can be calculated automatically on the basis of existing data
- Milestone Trend Analysis Reports: These reports track progress using milestones and confirmations to record completion or partial completion of an activity
Structure Report
A Structure report appears as follows: Picture Picture Actual Cost Report The T-code CJ13 is used to view an Actual Cost report: Picture
Project Budget Balance Report
This report can be viewed after budget is posted on funded program. To be certain of the available budget on a project, it is recommended that report FMEDD be run to see if there is any budget committed in the pre-posting stage. The T-code ZPJPRJBUDBAL is used to view an Actual Cost report. Picture
Cost Element Report
This report displays expenses by cost element and how they were settled and settlement receiver. View Actual cost report.
Picture
Master Data Report
The T-code CN43N runs a report that shows a summary of the WBSEs.
For example, one can pull a list of all AA projects or SB projects. The default report layout can be enriched by changing the report layout and add more data elements. The new layout can be saved as individual default layout which will be used the next time
PicturePicture Picture Picture Module 1: Project Management Process Overview


